Welcome to our guide on how to properly clean and maintain your gaming headset. Keeping your headset clean is essential for an enhanced gaming experience and to ensure its longevity. With regular cleaning and maintenance, you can prevent bacteria buildup, maintain audio quality, and extend the lifespan of your headset.
Key Takeaways:
- Cleaning your gaming headset regularly is important to prevent bacteria buildup and maintain audio quality.
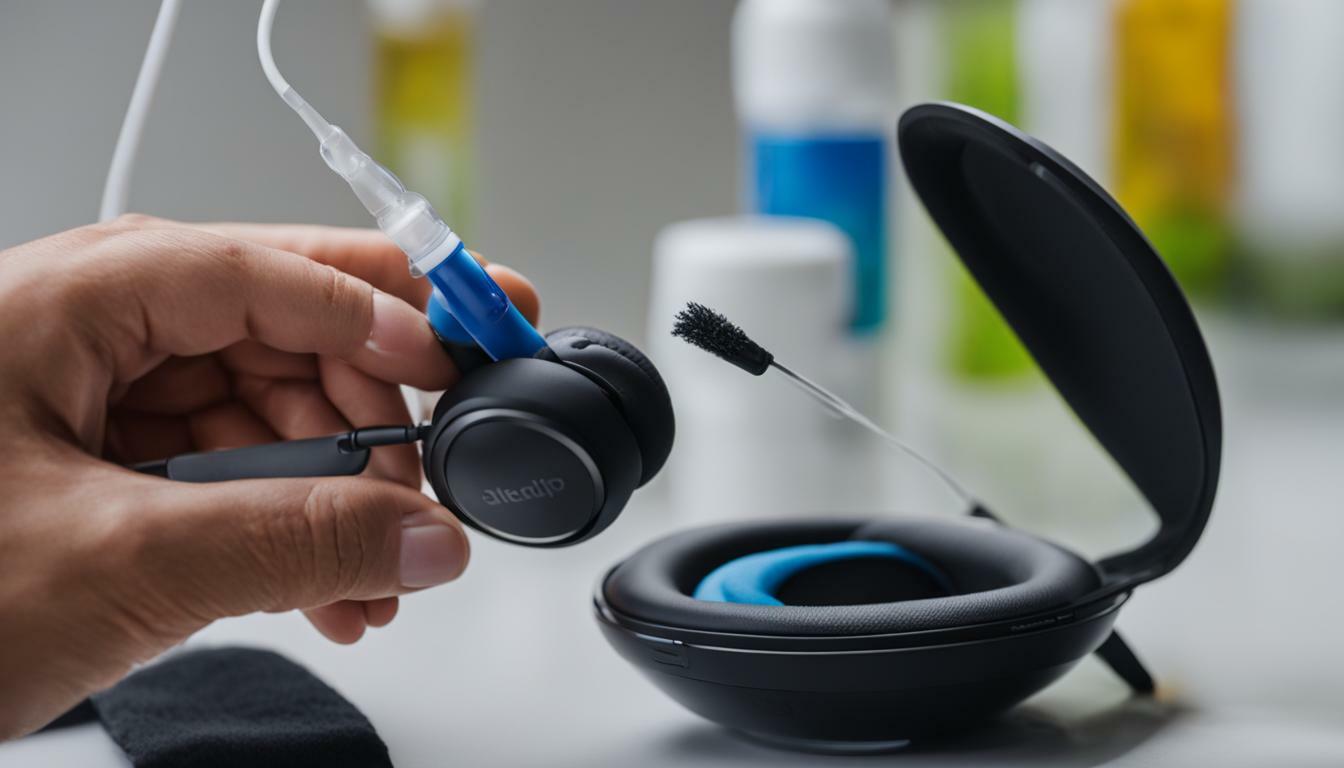
- You will need a mix of 70% Isopropyl alcohol and 30% water, microfiber cloths, cotton swabs, a toothbrush, a towel, and soapy water for cleaning.
- Start by removing the earpads and unplugging the cable (if applicable) before cleaning.
- Use a damp towel or washcloth to clean the ear cups and a cotton swab for the buttons.
- Wipe down the surface of the earcups with a disinfectant or soapy water solution.
- Clean the microphone and headband using the cleaning solution and a soft cloth.
- Follow the instructions in your headset’s manual to clean the ear pads, depending on the material.
- Ensure all components are air-dried before reassembling the headset.
- If applicable, clean the retractable headband according to your headset model.
By following these cleaning and maintenance tips, you can enjoy a clean and well-functioning gaming headset for many gaming sessions to come. Let’s get started!
The Importance of Cleaning Your Gaming Headset
Cleaning your gaming headset regularly is crucial for optimal performance, hygiene, and longevity. Over time, dirt, sweat, and bacteria can accumulate on the ear cups, headband, and other parts of the headset, compromising both the audio quality and your personal hygiene. Neglecting proper maintenance can lead to discomfort, reduced sound quality, and even the growth of harmful bacteria. By implementing a regular cleaning routine, you can ensure that your gaming headset remains in top condition and provides an immersive and clean gaming experience.
One of the main reasons to clean your gaming headset is to maintain its audio performance. Dust and debris can accumulate on the ear cups and speakers, affecting the sound quality and reducing the clarity of the audio. Regular cleaning helps to remove these particles, allowing the headset to deliver crisp and immersive sound during your gaming sessions. Additionally, cleaning your gaming headset can help prevent the buildup of bacteria and oil, which can cause skin irritation and acne breakouts if the headset is not properly cleaned.
Materials Needed for Cleaning
| Materials | Usage |
|---|
| 70% Isopropyl alcohol | To disinfect and remove dirt |
| Water | To dilute the alcohol |
| Microfiber cloths | To gently wipe down surfaces |
| Cotton swabs | To clean hard-to-reach areas |
| Toothbrush | To remove stubborn dirt |
| Towel | To dry components |
| Soapy water | To clean the surface of the ear cups |
When cleaning your gaming headset, it’s important to use the right materials. A mix of 70% Isopropyl alcohol and water is effective in disinfecting the headset and removing dirt. Microfiber cloths are ideal for wiping down surfaces without causing scratches. Cotton swabs can reach difficult areas, and a toothbrush can help tackle stubborn dirt. Remember to use a towel for drying all the cleaned components, and for cleaning the surface of the ear cups, a solution of soapy water works well.
Regularly cleaning your gaming headset not only helps maintain its performance and hygiene but also extends its overall lifespan. By implementing a cleaning routine, you can enjoy a clean and well-functioning headset that enhances your gaming experience. So, make sure to include cleaning and maintenance as part of your gaming routine to keep your headset in optimal condition for years to come.
The Materials Needed for Cleaning Your Gaming Headset
Properly cleaning and maintaining your gaming headset is essential for optimal performance and longevity. To ensure that you have everything you need to clean your headset effectively, here is a list of materials and tools that will come in handy:
1. Isopropyl Alcohol:
Isopropyl alcohol is a versatile cleaning agent that can be used to remove dirt, grime, and bacteria from your gaming headset. It is important to use a solution with a high alcohol concentration (at least 70%) for best results.
2. Water:
Water is essential for diluting the isopropyl alcohol and creating a gentle cleaning solution. Make sure to use clean, distilled water to avoid any mineral deposits or impurities that could potentially damage your headset.
3. Microfiber Cloths:
Microfiber cloths are ideal for cleaning delicate surfaces, such as the ear cups and headband of your gaming headset. They are soft, lint-free, and highly absorbent, making them perfect for removing smudges, fingerprints, and dust.
4. Cotton Swabs:
Cotton swabs are useful for cleaning hard-to-reach areas, such as the crevices around buttons and the microphone. They allow for precise cleaning and can easily remove dirt and debris without causing any damage.
5. Toothbrush:
A soft-bristled toothbrush can be used to gently scrub away stubborn dirt or grime from the surface of your gaming headset. Make sure to use a toothbrush dedicated solely to cleaning your headset to avoid transferring any bacteria from your mouth.
6. Towel:
A clean, dry towel is essential for drying off your headset after cleaning. Make sure to choose a towel that is soft and lint-free to avoid leaving behind any fibers on your headset.
7. Soapy Water:
In some cases, soapy water can be used to clean certain parts of your gaming headset. However, it is important to refer to the manufacturer’s instructions to determine which parts can be safely cleaned with soapy water.
By having these materials on hand, you will be well-prepared to clean your gaming headset thoroughly and ensure that it remains in top condition for an enhanced gaming experience.
Removing Earpads and Cables
Before we begin the cleaning process, it’s important to safely remove the earpads and unplug any cables from your gaming headset. This will ensure that you have full access to all the components that need to be cleaned, without causing any damage.
To remove the earpads, gently grip the edges of the earpads and pull them away from the ear cups. Be careful not to apply too much force, as this can cause the earpads to tear or become loose. If your gaming headset has detachable cables, unplug them from the headset and set them aside.
Removing Earpads:
- Gently grip the edges of the earpads
- Pull the earpads away from the ear cups
Unplugging Cables:
- Locate the cable connector on the headset
- Gently unplug the cable from the connector
By following these simple steps, you can safely detach the earpads and cables from your gaming headset, preparing it for a thorough cleaning. Remember to handle all components with care to avoid any potential damage.
| Gaming Headset Model | Earpad Removal Method | Cable Unplugging Method |
|---|
| Model X | Slide and lift | Twist and unplug |
| Model Y | Press and release tabs | Pull gently |
| Model Z | Rotate counterclockwise | Push and release |
Cleaning the Ear Cups
When it comes to cleaning your gaming headset, don’t forget about the ear cups. Over time, these can accumulate dirt, sweat, and oils from your skin, which can affect both the comfort and hygiene of your gaming experience. Fortunately, cleaning the ear cups is a relatively simple process that can help keep your headset in top condition.
To start, grab a damp towel or washcloth and gently wipe down the surface of the ear cups. Be sure to remove any visible dirt or grime, paying extra attention to the areas around the edges and seams. If your ear cups are removable, you can take them off and clean them separately for a more thorough cleaning. Just follow the manufacturer’s instructions for removing and cleaning them.
For stubborn stains or built-up grime, you may want to use a mild soap solution. Mix a small amount of gentle soap or shampoo with water and apply it to the dirty areas using a soft cloth or sponge. Gently scrub the surface, taking care not to apply too much pressure or get excess moisture into any electronic components. Once you’re satisfied with the cleanliness, rinse off any soap residue and dry the ear cups completely before reattaching them to your headset.
Table: Cleaning the Ear Cups
| Materials Needed | Instructions |
|---|
| Damp towel or washcloth | Wipe down the surface of the ear cups, removing visible dirt and grime. |
| Mild soap or shampoo | If necessary, mix with water to create a gentle cleaning solution. Apply to dirty areas and scrub gently with a soft cloth or sponge. |
| Water | Rinse off any soap residue after cleaning. |
| Soft cloth | Dry the ear cups completely before reattaching them to your headset. |
Remember, regular cleaning of your gaming headset’s ear cups can help maintain their comfort and extend their lifespan. By keeping them free from dirt and grime, you can ensure a more enjoyable and hygienic gaming experience. So, take a few moments to give your ear cups a good clean and get back to gaming in style.
Cleaning Around the Buttons
When it comes to cleaning your gaming headset, it’s important not to overlook the buttons. Over time, dirt, sweat, and oils can accumulate around these areas, affecting their functionality and overall appearance. To keep your headset in top condition, here’s a step-by-step guide on how to clean around the buttons.
Materials Needed:
1. Begin by dampening a cotton swab with isopropyl alcohol. Make sure the swab is not dripping with liquid, as excess moisture can damage the electronics.
2. Gently and carefully rub the cotton swab around the buttons, removing any dirt or grime. Be sure to use a circular motion to effectively clean all sides of the buttons.
3. If necessary, you can use a fresh cotton swab with isopropyl alcohol for each button to ensure thorough cleaning. This is especially important if the buttons are heavily soiled.
4. After cleaning, allow the buttons to air dry completely before using the headset again. This will help prevent any liquid from seeping into the internal components and causing damage.
By regularly cleaning around the buttons, you can maintain the functionality and aesthetics of your gaming headset. Remember to take gentle care while cleaning, and always follow the manufacturer’s guidelines for proper maintenance. By doing so, you’ll enjoy a clean and well-maintained headset for your gaming adventures.
| Step | Instructions |
|---|
| 1 | Dampen a cotton swab with isopropyl alcohol |
| 2 | Rub the cotton swab around the buttons in a circular motion |
| 3 | Use a fresh cotton swab for each button if necessary |
| 4 | Allow the buttons to air dry completely |
Wiping Down the Surface
When it comes to cleaning your gaming headset, don’t forget to give the surface of the ear cups some attention. Over time, dust, sweat, and oils from your skin can accumulate on the surface, making them look dirty and affecting the overall hygiene. To maintain a clean and fresh appearance, follow these simple steps:
Step 1: Prepare the Cleaning Solution
Start by preparing a cleaning solution using either a disinfectant spray or a mixture of mild soap and water. Avoid using harsh chemicals that could damage the headset. Once you have your cleaning solution ready, dampen a microfiber cloth with it.
Step 2: Wipe the Ear Cups
Gently wipe the surface of the ear cups with the dampened microfiber cloth. Pay close attention to any visible dirt or stains, ensuring that you clean every nook and cranny. Be careful not to apply too much pressure, as this could damage the headset.
Step 3: Dry the Ear Cups
After wiping down the ear cups, use a dry microfiber cloth to remove any excess moisture. Make sure the surface is completely dry before proceeding to the next step. This will help prevent any potential damage caused by water seeping into the internal components of the headset.
| Cleaning Materials | Description |
|---|
| Disinfectant spray or mild soap | To create a cleaning solution |
| Water | To dilute the soap if using |
| Microfiber cloth | To wipe down the ear cups |
| Dry microfiber cloth | To remove excess moisture |
Cleaning the Microphone and Headband
Cleaning the microphone and headband of your gaming headset is an essential part of its maintenance routine. Regular cleaning not only keeps these parts looking great but also helps to ensure optimal performance and longevity. In this section, we will provide you with step-by-step instructions on how to properly clean the microphone and headband of your gaming headset.
To clean the microphone, start by disconnecting it from the headset if it is detachable. Use a soft cloth dampened with a cleaning solution to gently wipe down the microphone, removing any dirt or smudges. Be sure to avoid getting liquid directly into the microphone openings to prevent damage. If there are any stubborn stains, you can use a cotton swab dipped in the cleaning solution to carefully clean those areas. Once cleaned, allow the microphone to air dry completely before reattaching it to the headset.
Moving on to the headband, it’s recommended to use a similar cleaning solution and a soft cloth to wipe down the surface. Gently rub the cloth along the headband, paying extra attention to any areas that may have accumulated dirt or sweat. If the headband is made of leather or faux leather, you can also use a mild leather cleaner to remove any stains or buildup. After cleaning, make sure to wipe away any excess moisture and allow the headband to air dry thoroughly before using the headset again.
Cleaning the Ear Pads
When it comes to cleaning gaming headsets, one essential component that often gets overlooked is the ear pads. These pads come into direct contact with our ears, making them prone to collecting dirt, sweat, and oils over time. Cleaning the ear pads not only helps maintain hygiene but also ensures optimal comfort and audio quality during gaming sessions.
The cleaning process for ear pads varies depending on the material they are made of. For leather or faux leather ear pads, start by wiping them gently with a damp cloth to remove any surface dirt or stains. Avoid using excessive water or harsh cleaning agents, as these can damage the material. Once the ear pads are clean, allow them to air dry completely before reattaching them to the gaming headset.
If your gaming headset has fabric or mesh ear pads, a deeper clean may be required. Begin by removing the ear pads from the headset, following the manufacturer’s instructions. Once removed, fill a basin or sink with warm soapy water and soak the ear pads for a few minutes. Gently agitate the water to loosen any dirt or debris. After soaking, rinse the ear pads thoroughly with clean water and squeeze out excess moisture. Place them on a clean towel and allow them to air dry completely before reassembling the gaming headset.
| Material | Cleaning Method |
|---|
| Leather or Faux Leather | Gently wipe with a damp cloth |
| Fabric or Mesh | Soak in warm soapy water, rinse, and air dry |
By regularly cleaning the ear pads of your gaming headset, you can enjoy a cleaner and more comfortable gaming experience. Take the time to read the manufacturer’s instructions and follow their recommended cleaning methods for your specific headset model. With a little care and maintenance, your gaming headset will stay in top condition, providing you with immersive audio and long-lasting comfort.
Cleaning the Gaming Headset: Air-Drying and Reassembling
Once you have thoroughly cleaned all the components of your gaming headset, it is crucial to allow them to air-dry completely before reassembling the headset. Air-drying ensures that no moisture remains trapped inside the headset, which could cause damage or affect the sound quality. Here are the steps to air-dry and reassemble your gaming headset:
- Set aside all the cleaned components on a clean, dry towel or a well-ventilated area.
- Allow the components to air-dry naturally for at least 24 to 48 hours. Avoid using any heat sources or hair dryers to speed up the drying process, as this can cause damage to the headset.
- Once the components are completely dry, carefully reassemble the headset according to the manufacturer’s instructions. Make sure all cables are securely plugged in and the earpads are correctly attached.
- Give the headset a final wipe-down using a clean, dry microfiber cloth to remove any remaining dust or fingerprints.
By air-drying your cleaned gaming headset, you can ensure that all the components are free from moisture and ready to deliver optimal performance during your gaming sessions.
| Step | Action |
|---|
| 1 | Set aside all the cleaned components on a clean, dry towel or a well-ventilated area. |
| 2 | Allow the components to air-dry naturally for at least 24 to 48 hours. Avoid using any heat sources or hair dryers to speed up the drying process, as this can cause damage to the headset. |
| 3 | Once the components are completely dry, carefully reassemble the headset according to the manufacturer’s instructions. Make sure all cables are securely plugged in and the earpads are correctly attached. |
| 4 | Give the headset a final wipe-down using a clean, dry microfiber cloth to remove any remaining dust or fingerprints. |
Summary:
After thoroughly cleaning your gaming headset, air-drying all the components is essential to ensure the removal of any moisture and prevent potential damage. Follow the steps provided, allowing sufficient time for the components to dry naturally. Once dry, reassemble the headset carefully, ensuring all cables are securely plugged in and the earpads are correctly attached. Finally, give the headset a final wipe-down to remove any remaining dust or fingerprints. With a properly cleaned and air-dried gaming headset, you can enjoy an enhanced gaming experience with optimal sound quality.
Cleaning the Retractable Headband
When it comes to maintaining your gaming headset, don’t forget to pay attention to the retractable headband. This component plays a crucial role in ensuring a comfortable and secure fit, so it’s essential to keep it clean and free from debris. Here are some simple steps to clean the retractable headband effectively:
- Start by extending the headband fully to expose all the hidden areas that may collect dirt and dust.
- Gently wipe down the entire surface of the headband using a damp cloth or a cotton swab dipped in a mild cleaning solution. Be sure to remove any visible dirt or grime.
- If there are any stubborn stains or sticky residue on the headband, you can use a small amount of rubbing alcohol on a cloth to help break it down. Just make sure to avoid excessive moisture, as it may damage the material.
- After cleaning, give the headband a thorough wipe with a dry cloth to remove any excess moisture.
- Allow the retractable headband to air dry completely before retracting it back into its original position. This will help prevent any damage or warping of the headband mechanism.
By regularly cleaning the retractable headband of your gaming headset, you can extend its lifespan and ensure optimal comfort during your gaming sessions. Remember to follow the manufacturer’s instructions and recommendations for cleaning to avoid any potential damage.
Conclusion
In conclusion, regularly cleaning and maintaining your gaming headset is essential for optimal performance and longevity. By following the proper cleaning techniques and using the right materials, you can ensure that your headset remains in top condition, providing you with an immersive and enjoyable gaming experience every time.
Proper headset maintenance not only helps to remove dirt, dust, and grime, but it also eliminates the buildup of bacteria and germs that can accumulate over time. This is especially important for hygiene purposes, as gaming headsets come into close contact with your ears and face during prolonged gaming sessions.
Remember to clean all the different components of your gaming headset, from the ear cups to the microphone and headband. Pay attention to the specific cleaning instructions provided by the manufacturer, especially when it comes to cleaning the ear pads, as different materials may require different cleaning methods.
By incorporating regular cleaning and maintenance into your headset care routine, you can extend the lifespan of your gaming headset and ensure optimal audio quality for years to come. So don’t overlook the importance of cleaning your gaming headset – it’s a simple yet crucial step in enhancing your gaming experience.
FAQ
How often should I clean my gaming headset?
It is recommended to clean your gaming headset at least once a month to prevent bacteria buildup and maintain its performance.
Can I use any cleaning solution on my gaming headset?
No, it is important to use a mixture of 70% Isopropyl alcohol and 30% water to clean your gaming headset. Other cleaning solutions may damage the headset.
Can I clean the ear pads in the washing machine?
It depends on the material of the ear pads. Please refer to your headset’s manual for specific instructions on how to clean the ear pads.
Can I use a hairdryer to speed up the drying process?
It is not recommended to use a hairdryer as the heat may damage the components of the headset. It is best to let the headset air dry naturally.
How do I clean the retractable headband?
To clean the retractable headband, gently wipe it with a damp cloth using the cleaning solution mentioned earlier. Avoid submerging the headband in water.
Can I submerge the entire headset in water for cleaning?
No, you should never submerge the entire headset in water. Only use damp cloths or cotton swabs with cleaning solution to clean the headset.